


Overlapping Felt Specs
FIBERGLAS™ REINFORCED FELT
Owens Corning® Fiberglas™ Reinforced Felt should be applied to a properly prepared dry deck that is smooth, clean and free from any depressions, projections or protruding nails. Roof decks should be structurally sound and meet or exceed minimum requirements of the deck manufacturer and local codes.
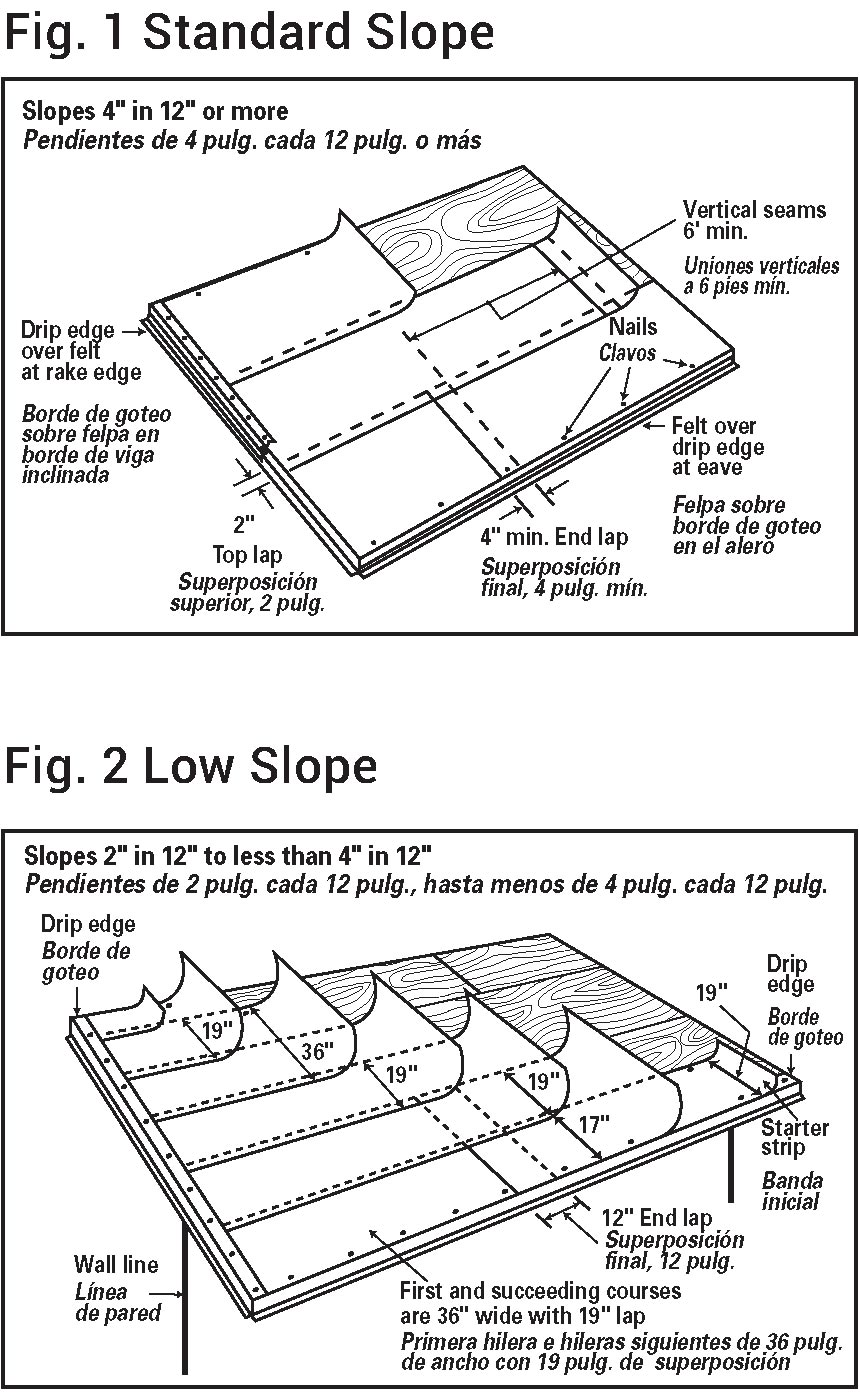
Slopes 4” in 12” or more
Always lay the felt underlayment parallel to the eaves, lapping each course at least 2” over the underlying course. Felt underlayment should not run perpendicular to the eaves. Secure the felt underlayment with nails to hold it in place. (See Fig. 1.)
Nails should be driven straight and flush with the surface. If two or more pieces are required to continue a course, lap the ends at least 4.” End laps in a succeeding course should be located at least 6’ from end laps in the preceding course. Lap the felt underlayment a minimum of 6” from both sides over all hips, ridges and valleys. Where the roof meets a vertical surface, carry the felt underlayment at least 4” up the surface.
Slopes 2” in 12” to less than 4” in 12”
On low-slope applications, cover the deck with two layers of non-perforated asphalt saturated felt underlayment. (See Fig. 2.)
Begin by fastening a 19” wide strip of felt underlayment placed along the eaves. Place a full width sheet over the starter with a long edge placed along the eave and completely overlapping the initial starter course. All succeeding courses will be a minimum of 36” wide and should be positioned to overlap the preceding course by 19.” Secure each course by only enough fasteners to hold it in place until the shingles are applied. End laps should be 12” wide and located at least 6’ from end laps in the preceding course.
INSTALLATION INSTRUCTIONS
Owens Corning® ProArmor® Synthetic Roof Underlayment should be applied to a properly prepared dry deck that is smooth, clean and free from any depressions, projections, or protruding nails. Acceptable roof deck materials for application are minimum ⅜" plywood or minimum 7⁄16" OSB. Roof decks should be structurally sound and meet or exceed minimum requirements of the roof deck manufacturer and local building codes. ProArmor® underlayment is designed for use under asphalt shingles only and must be covered within 30 days of application.
Always follow safe roofing practices and OSHA safety requirements. Always wear and use fall protection devices when working on roofs. Use caution when walking or standing on ProArmor® underlayment in wet or dusty conditions that may reduce traction. Failure to use proper safety equipment and footwear can result in serious injury.
Fasteners
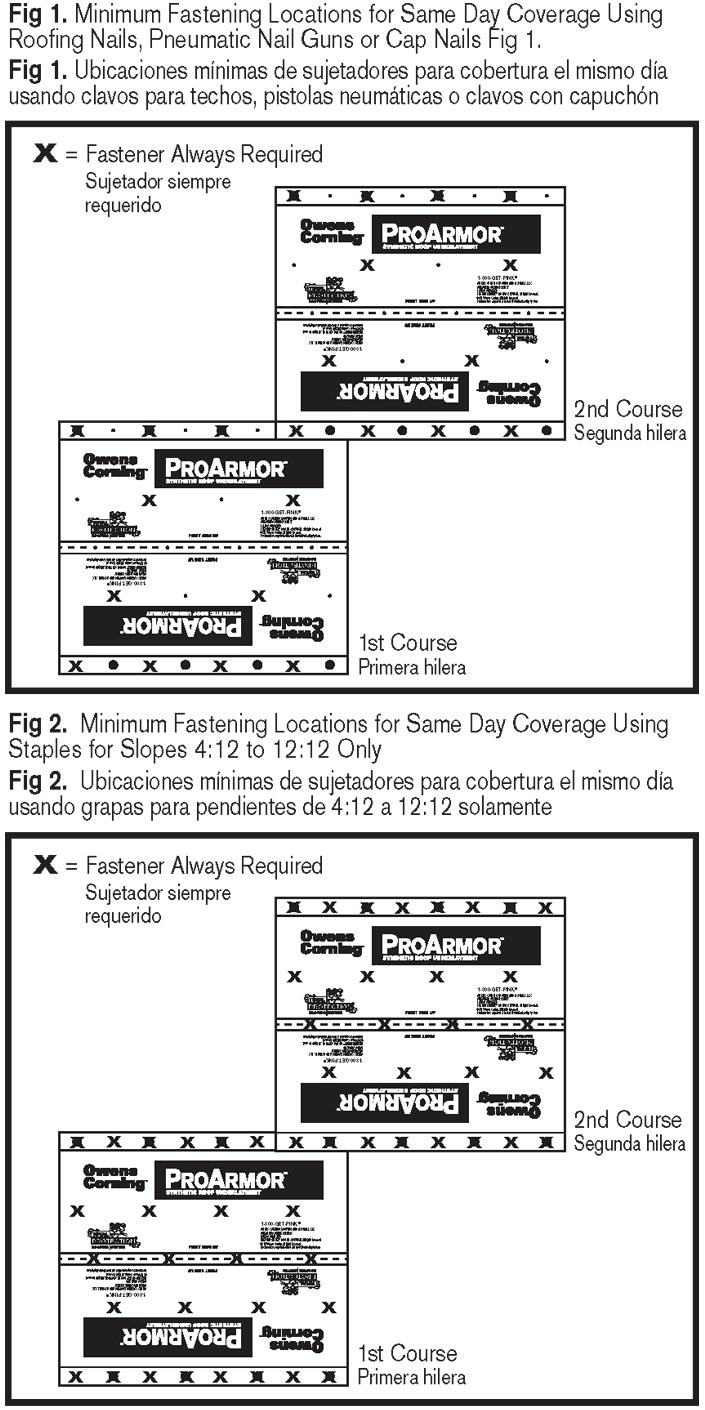
If the roof will not be covered with asphalt shingles on the same day, ProArmor® underlayment must be attached to the roof deck using plastic or steel cap fasteners having a minimum 1" diameter cap. Roofing nails and pneumatic nail guns may be used for same day installations for all slopes. Staples may be used for same day installations on slopes 2:12 to 12:12. All fasteners should be driven straight and flush with the surface. Consult local building codes for fastener type and spacing requirements.
Lap Requirements – All Slopes
If two or more pieces are required to continue a course, lap the ends at least 4" (must be at least 12" for slopes 2:12 to less than 4:12). End laps in a succeeding course should be located at least 6' from laps in the preceding course. Lap ProArmor™ underlayment a minimum of 6" from both sides over all hips, ridges and valleys. Where the roof meets a wall, extend ProArmor® underlayment a minimum 4" up the wall.
Slopes 4:12 or Greater
Always lay ProArmor® underlayment parallel to the eaves, lapping each course at least 3" over the underlying course. For same day coverage, minimum fastening locations for roofing nails, pneumatic nail guns or cap nails are shown in Fig. 1 and staples in Fig. 2. If required, additional fasteners can be used for same day coverage. See Fasteners section for additional details.
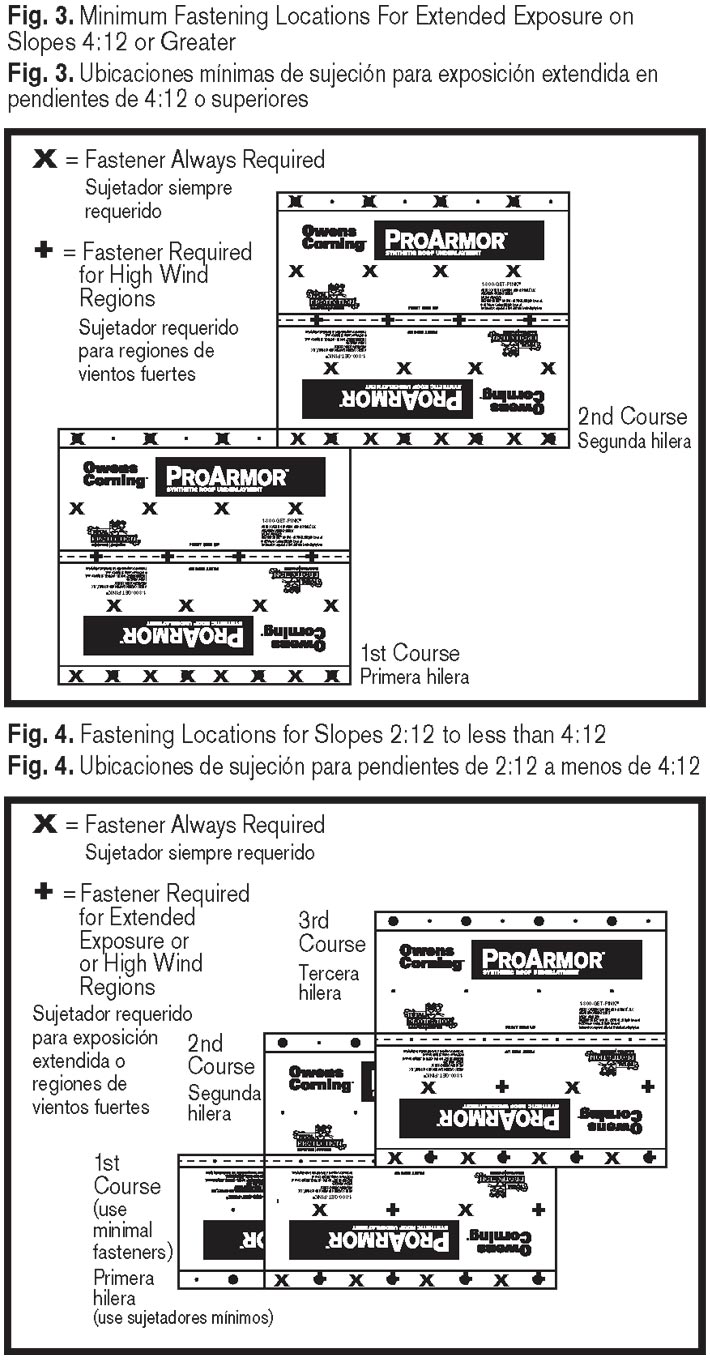
If ProArmor® underlayment will not be covered on the same day with asphalt shingles (extended exposure up to 30 days), use only plastic or steel cap fasteners having a minimum 1" diameter cap for all slopes. Fasten in both the overlapping area and the field area of ProArmor® underlayment.
Slopes 2:12 to less than 4:12
On all lower slope applications, cover the deck with two layers of ProArmor® underlayment. Roofing nails, pneumatic nail guns and staples may be used for same day installations. If ProArmor® underlayment will not be covered on the same day with asphalt shingles (extended exposure up to 30 days), use only plastic or steel cap fasteners having a minimum 1" diameter cap. Begin by fastening a 22" wide strip of ProArmor™ underlayment along the eaves with the minimal fasteners needed to hold the course in place. Place a full-width sheet over the 22" course with the long edge placed along the eaves and completely overlapping the initial starter course. All succeeding courses will be a minimum of 42" wide and should be positioned to overlap the preceding course by 22" (to lowest solid centerline). Additional fasteners may be required in high wind regions per local building codes. See Fig. 4 and Fasteners section for details.
CAUTION
Caution: Roof surface may be slippery, especially when dusty, wet or icy. Use a fall protection system when installing. Wear soft-soled shoes. Walk with care.
Falling Hazard: Secure area below work and materials on roof. Unsecured materials may slide when placed on roof. Place on level plane or secure to prevent sliding. Wear a hard hat.
Caution: Safety glasses should always be worn when using power tools. Wear gloves when installing to avoid cuts and abrasions.
TAMKO does not specifically address this application in our application instructions.
This is from the Asphalt Roofing Manufacturers Association (ARMA) Residential Asphalt Roofing Manual: Lap the underlayment a minimum of 6” from both sides over all hips, ridges and valleys.
TAMKO is a member of ARMA and follows the guidelines published by ARMA.
Thank you.
IKO INDUSTRIES LTD.
40 HANSEN ROAD SOUTH • BRAMPTON, ONTARIO L6W 3H4 • TEL: (905) 457-2880 • FAX: (905) 450-3620
March 29, 2023
RE: Underlayment laps (overlaps)
To whom it may concern,
It is my understanding there is a question about proper underlayment laps at the hips, ridges, and valleys.
IKO underlayment must be applied with a minimum of 6-inch laps on both sides at the hips, ridges, and valleys. For side and end laps, please follow the specific IKO underlayment application instructions.
Thank you for your interest in IKO.
Sincerely,
Allan Lawrence
Codes and Compliance
CC – Victor Rocha
American Home Exteriors LLC.
502-994-3401
Here’s a Tip…
Lay underlayment approximately 6" from both sides over hips, ridges, and valleys. Where the roof meets a vertical surface, install the underlayment about 4" or more up the surface.
APPLYING UNDERLAYMENT BETWEEN SHINGLE LAYERS
CertainTeed advises against applying underlayment over existing roofing. The underlayment may cover or create soft areas in the roof surface. These soft spots can cause shingle fasteners to be under- or over-driven, thereby weakening the shingle hold-down strength (potential blow-offs) or tearing holes in the shingles that can allow water intrusion (potential leaks). Underlayment applied over existing roofing interferes with the ability to nest the new shingles into the old. Nesting is an accepted and time-proven method of applying same-size new shingles over old ones.
So, if the old shingles are to be left in place and the new shingles can be nested into the old, then no additional underlayment is required. There are some who believe that the introduction of an additional vapor retarder between the roofing layers can cause moisture collection and deterioration.
FASTENER TYPE
CertainTeed recommends using nails rather than staples. Nails provide more resistance against underlayment tear out. It is very important, whether hand nailing or using a pneumatic gun, that the fasteners be driven flush.
INSTALLATION METHOD:
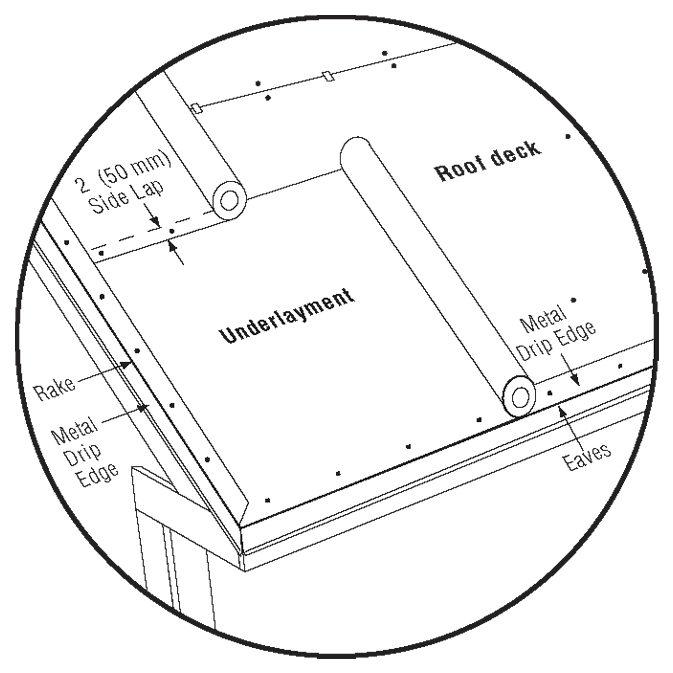
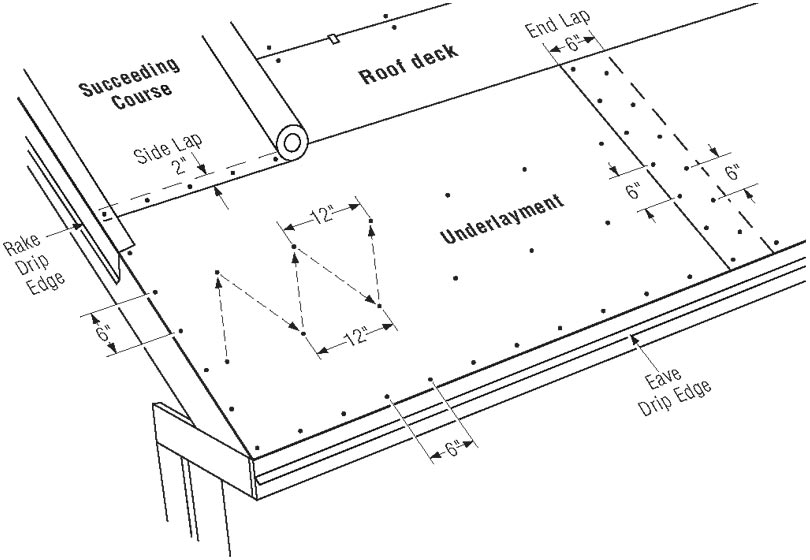
- Unroll the underlayment parallel with the eaves. The eaves edge of the underlayment should go OVER the drip edge eaves flashing, but go UNDER the drip edge flashing along the rake.
- Around the perimeter of the underlayment, place the nails approximately 6 inches apart and about 1 inch in from the edge. In the main area of the underlayment, two rows of nails are used. The first is placed 12" up from the bottom edge and the second is 24" from that same edge (or in fact 12" from the upper edge). This nicely separates the 36" wide underlayment sheet into thirds. Nail along these two rows 12-15" apart. Nail placement should be alternated so that one row places the nail opposite the open area of the first, creating a sort of zigzag pattern. This will result in a simple pattern with all nails being approximately 12-15" apart.
- Succeeding courses should be unrolled in a similar manner overlapping the previous course by 2". Be careful to roll it out straight as the underlayment will tend to slide down the pitch of the roof and end up crooked. The spacing of nails in this overlap area should be approximately 6" apart, centered in the 2" area.
- If the length of the roll is not sufficient to complete the entire run, an end lap of 6” is required. We recommend two rows of nails 6” apart to hold the lapped edges in place. End laps should be located 6-8’ from any other end lap that may be in the preceding underlayment course.
Roof Repair Underlayment Requirements For Hips And Ridges
What Are The Underlayment Requirements For Hips When Only Replacing A Single Roof Plane?
- For hips, the underlayment should … be lapped over the hips at least 4” (102 mm) to 6” (152 mm) as would be done on a new or complete tear-off installation.
- End nails of each course of shingles that are being left on the adjacent roof plane must be removed so that the underlayment may be inserted between the shingles and existing underlayment.
- Use a 12” (305 mm) to 18” (457 mm) strip of underlaymentto run along the hip and overlap the new underlayment on the replacement plane at least 6” (152 mm) to 12” (305 mm).
- Once complete, the existing shingles must be re-nailed, hand sealed, and then the new hip cap can be installed. If any existing shingles are damaged, they must be replaced with new shingles.
Note: If the hip includes a hip vent, then the new underlayment must be trimmed to the edge of the vent slots so it will not interfere with air movement.
What Are The Underlayment Requirements For Ridges When Only Replacing A Single Roof Plane?
- For ridges, the underlayment should … be lapped over the ridge at least 4” (102 mm) to 6” (152 mm) as would be done on a new or complete tear-off installation.
- Nails of the top course of shingles that are being left on the adjacent roof plane may need to be removed so that the underlayment may be inserted between the shingles and existing underlayment.
- Use a 12” (305 mm) to 18” (457 mm) strip of underlaymentto run along the ridge and overlap the new underlayment on the replacement plane at least 6” (152 mm) to 12” (305 mm).
- Once complete, the existing shingles must be re-nailed, hand sealed, and then the new hip cap can be installed. If any existing shingles are damaged, they must be replaced with new shingles.
Note: If the ridge includes a ridge vent, then the new underlayment must be trimmed to the edge of the vent slots so as not to block the venting.
Will Reusing Existing Materials Or Not Following These Instructions Void My Shingle Limited Warranty?
No… The GAF Shingle & Accessory Limited Warranty will remain in effect per its terms and conditions, however, any damage due to reusing existing shingles, ridge cap, underlayments or leak barriers are not covered under the terms of the limited warranty. The GAF Shingle & Accessory Limited Warranty covers manufacturing defects only; it does not cover the workmanship of the roofer who installs the shingles, the design of the roof, or the installation/performance of the roof deck. GAF makes no representation or warranty that the installation conforms to local code requirements and assumes no responsibility for code compliance.
Questions? GAF Technical Services Can Assist You… with these and other questions you may have regarding your new roof installation. Technical Support Services can be contacted at 800-766-3411. The GAF website is a great resource for just about any question you may have or for additional information you may require. Please visit www.gaf.com to find the latest information on our products and their installation.
Important: This document supersedes any prior GAF Technical Advisory Bulletins on this topic. Please always check www.gaf.com to make sure you have the most up to date information.